Thursday, September 8, 2011

Amish Slaw

I love coleslaw...but only when it's vinegar based.  I'm not a mayo girl (in fact, if something I love has mayo in it, I make sure no one lets me in on the secret!), so this was a perfect coleslaw for me.  It's also great to make when it's going to be sitting out for a while--there's no dairy in it whatsoever!

Note:  There will be a LOT of the dressing left over.  The Amish made this slaw (according to the woman who shared the recipe with me) to help preserve veggies.  It's not a flaw in the dressing.  Use a slotted spoon, like this adorable one from ModCloth:


Anywho, moving on...Amish Slaw!

Ingredients
1 medium head cabbage, cored and shredded (I didn't use a purple one, but you could)
1 medium onion, finely chopped (I'm not a huge raw onion fan, so I used about 1/3 of the whole onion)
1 yellow bell pepper, sliced thinly
2 shredded carrots
1 cup white sugar
1/2 cup white vinegar
1 tsp celery seed
1 tsp white sugar
1 tsp prepared mustard (I used Nance's Sharp and Creamy, not yellow mustard)
3/4 cup vegetable oil


Directions
1.  In a large bowl, toss together the cabbage, onion, bell pepper, and carrot with the 1 cup of sugar.

2.  In a small saucepan, combine the vinegar, salt, celery seed, 1 tsp white sugar, mustard, and oil.  Bring to a boil and cook for 3 minutes.  Cool completely, then pour over cabbage mixture.  Toss to coat.  Refrigerate overnight for best flavor.

This coleslaw is amazing the day it's made, but even better a couple days later when the flavors get to marry a bit.  It's definitely a crowd pleaser!
1/2 cup apple cider vinegar
1 tsp

Banana Bread!

So, I had 3 bananas turning brown in my house--my roommate from college Julie once did a Dietetics Experiment involving banana bread with different stages of banana in them, so I knew it was the perfect time for it!

Photos to come soon!


Ingredients
1/2 cup butter, melted
1 cup white sugar
2 eggs
1 tbsp vanilla extract
1 1/2 cups all-purpose flour
1 tsp baking soda
1/2 tsp salt
1/2 cup sour cream
2 medium bananas, mashed
1 cup chocolate chips, optional (I actually used a combo of white and semi-sweet chips!  Delish!)


Directions
1.  Preheat the oven to 350 degrees F.  Grease 2 9x5 inch loaf pans.

2.  In a large bowl, stir together the melted butter and sugar.  Add the eggs and vanilla.  Mix well.  In another bowl, sift together the flour, baking soda, and salt.  Stir into the butter mixture until smooth.  Finally, fold in the sour cream, mashed bananas, and chocolate chips.

3.  Spread evenly into the prepared pans.

4.  Bake at 350 degrees F for 60 minutes or until a toothpick inserted into the center comes out clean.  Cool loaf in the pan for 10 minutes before removing.


I think the best part of this banana bread is how moist it is, and how amazing it is while still hot--the chips are so melty!  Enjoy!

Friday, June 10, 2011

I've been slacking!

This past month has been hectic, to say the least!  I'll be updating a whole bunch within the next couple of days.  

Any good recipes for the summer?  Let me know!

Tuesday, May 3, 2011

Sharron's Biscuits

My boyfriend's mom is an amazing baker and at home chef.  Every time we visit her, she sends us home with cookies!  We eat dinner at home and play board or card games after dinner.  She even makes her own whipped cream on a whim for Angel Food Cake, but that'll have to be saved for another blog.  Because this blog is dedicated to Sharron's biscuits, which she trusted me to bake for her because she was working late.  Needless to say, I didn't want to screw these up!


Ingredients
-3 cups flour
-4 1/2 tsp baking powder
-1 tsp salt
-1/3 cup butter, room temperature
-1 1/4 cup milk


Directions
1.  Preheat oven to 450 degrees.

2.  Add flour, baking powder, and salt to a bowl (sifting if you'd like).  Mix well.  Cut in butter with a pastry blender until the mixture looks like a "meal."  Stir in almost all the milk.  If dough doesn't seem pliable, add enough milk to make a soft, puffy dough easy to roll out.  (Too much milk makes dough sticky, while not enough makes biscuits dry.)  Round up on lightly floured surface.  Knead lightly 20-25 times.  Don't be too rough on your biscuits!

3.  Roll out to about 1/2 inch thick.  Cut close together with a biscuit/cookie cutter.  Fit leftover dough together.  Do not reknead.  Roll out dough and repeat until there's not enough dough to roll out anymore.  (I use the last bit of dough to make a funny looking biscuit.  It's a test biscuit to eat right out of the oven!

4.  Place close together for biscuits with soft sides, about 1/2 inch to inch apart for biscuits with crusty sides on a greased baking sheet.  Place in the middle of the oven.  Bake for 10-12 minutes, until the tops of the biscuits are a light golden brown. 

Drop Biscuits
Make biscuits--except increase milk to 1 1/2 cups.  Drop from spoon onto greased pan or into greased muffin cups.

Buttermilk Biscuits
Make biscuits--except, in place of milk, use buttermilk.  Use only 3 1/2 tsp baking powder and add 1/2 tsp baking soda.

Bacon Biscuits
Make biscuits--except add 1/3 cup drained cooked bacon bits (about 4 strips) to flour and butter mixture.

Herb Biscuits
Make biscuits--except add 1/4 tsp dry mustard, 1/2 tsp crumbled dry sage, and 1 1/4 tsp caraway seeds to flour mixture.  Also, try this recipe with your favorite herbs!

Saturday, April 30, 2011

Manicotti con Vino!

This recipe was developed from a manicotti recipe I received via email.  It's easy, tastes delicious, and is healthier than the white sauce versions of manicotti.

Ingredients
-2 tbsp olive oil
-1/2 of a medium onion (I used a yellow one), chopped
-4 cloves of garlic, minced (or use a garlic press)
-1 lb lean ground beef
-1 package of frozen chopped spinach, thawed and drained
-1 12 oz package of manicotti shells
-1 cup ricotta cheese
-1/4 cup parmesean cheese
-2 eggs
-2 jars spaghetti sauce (I use Classico Cabernet Marinara, thus the vino!)
-Your favorite italian seasoning
-mozzarella cheese

Directions


1.  Heat oil in a large skillet over medium heat. Saute onions until translucent. Saute garlic for 1 minute and stir in ground beef. Cook until well browned and crumbled. Set aside to cool.


2.  Preheat the oven to 400 degrees.


3.  To the ground beef mixture add the cooked spinach, ricotta cheese, parmesan cheese, and spices. When the mixture is cool, add the beaten eggs. Spread spaghetti sauce in the bottom of a 9x13 inch baking dish to cover the bottom of the dish.  Stuff the manicotti shells with the meat/cheese mixture (An easy way is to put the mixture into a ziptop bag, cut the corner, and pipe the mixture into the shell); place shells in prepared dish.  


4.  Pour the remaining spaghetti sauce over the manicotti so none of the shells can be seen.  This will cook the shells to a nice al dente in the oven.  Cover the baking dish with aluminum foil and place in the oven for 35 minutes.  


5.  After 35 minutes, pull the wire rack out, take the foil off, and cover with the mozzarella cheese.  Close the oven and continue baking for 10 minutes.


Enjoy!

Tuesday, March 22, 2011

Bread!

I hate the bread out here.  Let me preface this--I grew up in sunny Floridian suburbia and now live in the mountains, 2 hours from a big city.  I love it here, but we have crappy bread.  We don't have any upscale grocery stores, and all our bread tastes like dry cardboard.  So much money was spent each year on bread I hated, so I decided to buy a breadmaker.  I found one on Food Network for about 60 bucks, and am now a happy breadmaker!

It's fun, delicious, fresh, and guaranteed no preservatives.  Can't beat that.  Here's the recipe I used for my first loaf!


Homestyle White Bread


Ingredients
1 cup + 1 tbsp water
1 tbsp butter, softened
2 tbsp sugar
1 tbsp nonfat dry milk powder
1 1/2 tsp salt
3 cups bread flour
2 1/2 tsp bread machine yeast

Directions
1.  Place the ingredients in your breadmaker bread pan in the following order:  water, butter, sugar, milk powder, salt, flour.

2.  With your finger, make a small indentation on one side of the flour.  Add yeast to the indentation, making sure it does not come into contact with the liquid ingredients.

3.  Carefully insert the bread pan into the breadmaker and gently close the lid.  Plug the power cord into an outlet.   Turn your breadmaker on then sit back, relax, and wait for your bread!

*Remember to take the bread pan out of the breadmaker as soon as it's done baking, but leave the bread in the pan until it has cooled.  *

The best part of making your own bread (besides the eating part, of course) is the amazing way your house smells while it's baking!  Delicious!

Tuesday, March 15, 2011

Freaking Awesome Cookies

Preheat the oven to 350 degrees F.
Ingredients:
1 cup (2 sticks) of butter, room temperature
1 cup sugar
1 teaspoon vanilla extract
1 teaspoon almond extract
2 cups flour (+ 1 tablespoon if baking at high altitude, like me)
1 teaspoon baking powder
1/4 teaspoon baking soda
1/8 teaspoon cream of tarter
1 egg
1/2 cup mini chocolate chips (optional, I usually skip them.)
1. Cream together the butter, sugar, and vanilla.
2. Add the remaining ingredients, ending with the egg. Mix all the ingredients together for 2 minutes on medium-high on an electric mixer. If baking chocolate chip cookies, add the mini chips after adding the egg and mix thoroughly.
3. Grease 2 cookie sheets, or line with parchment paper.
4. For smaller cookies, roll 1 tablespoon of dough into a ball with the palms of your hands. For larger cookies (4-5 inches), roll 1/3 cup of dough into a ball with the palms of your hands.
5. Slightly flatten each cookie with the palm of your hand. Sprinkle the top of each cookie with a topping of your choice if you'd like (sliced almonds, sprinkles, chocolate chips, etc.)
6. Bake smaller cookies for 7-10 minutes, until the edges are light brown. Bake larger cookies for 10-12 minutes or until the edges are light brown.  Enjoy!

Thursday, March 10, 2011

My Secret Ingredient

It's no secret what you cook can only be as good as the ingredients you use.  Especially spices.  The ones you get from the store can be over a year old before you even purchase them!


Penzey's is my secret.  All their spices are fresh, and only a tad bit more than the ones you get from the grocery store.   One whiff and you'll never go back!  They make it easy too--you can order online or from their catalogue if you're not located by one of their brick and mortar stores.  To say I'm addicted is a bit of an understatement.

Plus, they have delicious recipes in every catalogue!  Told you, you can't beat it.   And, no, this post isn't sponsored.  I just love them that much.

Ralphie's Lazy Man Brisket

My dad is writing a cookbook.  I don't know if it'll ever get published, but this recipe is too good to leave to chance.  Plus, it's easy.  The best thing about crock pots--put all the stuff in the pot in the morning, work all day, come home to a great meal.  Can't beat it.


Ingredients
One 2-4 lb brisket (or similar cut of meat)
One can of Coke (Dr. Pepper also can be used)
Two cups ketchup
One package of onion soup mix
One cup water

Directions
Trim excess fat from meat.  Pour all ingredients into crock pot and mix slightly.  Add the meat.  Cover and cook on LOW for 8-10 hours until meat pours apart easily.

Some people like brisket on a bun but I like it as is, with a side of veggies and some mashed potatoes.  The bun can be saved for tomorrow's brisket sandwich lunch!

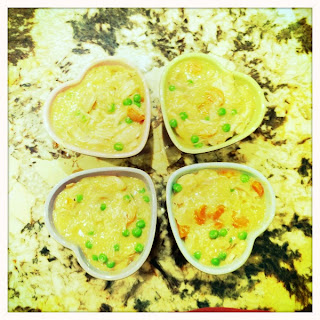
Chicken Pot Pie

This recipe is a total crowd pleaser (and one of the beau's favorites)!  They'll never know there's no cream in it!

Healthy?  Check.
Creamy?  Check.
Super Delicious?  Absolutely.

The secret here is making a rue before adding the chicken broth, then whisking a LOT.  The rue provides a wonderful base, and adds a little nuttiness to the flavor.

Ingredients
4 tbsp unsalted butter
1 medium onion, diced
2-3 large carrots, sliced
1/2 cup all-purpose flour
salt & pepper to taste
4 cups low-sodium chicken broth (I like Kitchen Basics)
3 cups cooked chicken (I use a rotisserie chicken from the store.  Take it apart by hand, and it adds to the rustic feel of the entire dish.  Plus, the rotisserie chicken is more flavorful, which means you can use less salt!)
1 cup frozen peas
1 1/2 tsp fresh thyme leaves
1 sheet frozen puff pastry (I haven't found a recipe for a good one yet, so the store bought one works)
1 egg yolk


1.  In a medium saucepan, melt butter over medium heat.  Add onion and carrot and cook until onion softens, about 6 minutes (longer for high altitude).  Add flour and a pinch of salt; cook, stirring frequently, until the mixture is pale golden, has a slightly nutty aroma, and is the texture of cooked oatmeal, about 5 minutes (again, longer if high altitude).


2.  Whisking constantly, add broth.  Bring to a boil, stirring frequently, until mixture thickens, about 8 minutes.  Reduce to a simmer and cook 10 minutes.  Stir in chicken, peas, and thyme.  Season with salt and pepper (I normally under-salt a bit, to let each person add their desired salt themselves).  Divide mixture among ramekins; refrigerate until room temperature, about 20 minutes.

3.  Preheat the oven to 375 degrees F.  Roll out pastry (it should be a good thickness right out of the box).  Cut into squares, a bit larger than the ramekins.  With the tip of a sharp knife, cut vents into the pastry.  Cover ramekins with the pastry.  In a small bowl, lightly beat the egg yolk with 1 tsp water; top pot pies with egg wash.  Refrigerate 15 minutes.


4.  Bake until pastry is deep golden brown and juices are bubbling, about 35 minutes.


This is a lengthy process, about 1 1/2 hours, but absolutely delicious and totally worth it!  I always make sure to make a few extra to freeze for another dinner on a cold night.

Hello there, Foodies!

After the success of my first blog, EatDrinkSmile, I wanted to venture into the world of blogging about food I cook and bake, not just food I eat out!

My name is Steph.  I love being in the kitchen and playing with food.  I love Food Network.  I love eating out.  I'm also a snowboard instructor, so I'm super active and always hungry.  Please feel free to try my recipes and to send me some of yours to try!

Many thanks to Peas & Crayons for the love and inspiration.  Love you Jenn!